Our Passive Solar Home
Our driving questions for this project were -- How can we design a home that is comfortable in all conditions without the use of electricity? What is the most efficient way to heat and cool a home? Using the guidelines given, we were organized into groups of four and assigned a lot of mini-projects, eventually leading up to our final designs for the actual structure. We started off with the task of building a makeshift water heater, then learned about solar angles and how they change during different seasons, and then made a day lighting model. After completing that, we continued on to select a site for our home to go. Upon our decision, the class conducted a materials testing lab. The main part of our project was the building design including blueprints, a model, and a list of the supplies, quantity, and cost. In addition, we designed a wind turbine and created a table showing why we built a passive solar home. We worked on this entire project over a period of about three months.
Hot Water Heater
The purpose of this assignment was to figure out the best way to efficiently heat water using the sun. My group used a cardboard box to capture most of the heat from the sunlight and transfer it to the water. We ran copper tubing through the box on the bottom which was painted black to absorb heat. On the sides, we put aluminum foil in to reflect light and heat onto the bottom. We taped plastic wrap over the top to help trap heat. The water storage was connected to the box using plastic tubing for the water to run through. To keep the water hot, we placed an empty soda bottle in a paper bag and surrounded the bottle with insulation. Our "hot" water heater raised the temperature by nine degrees.
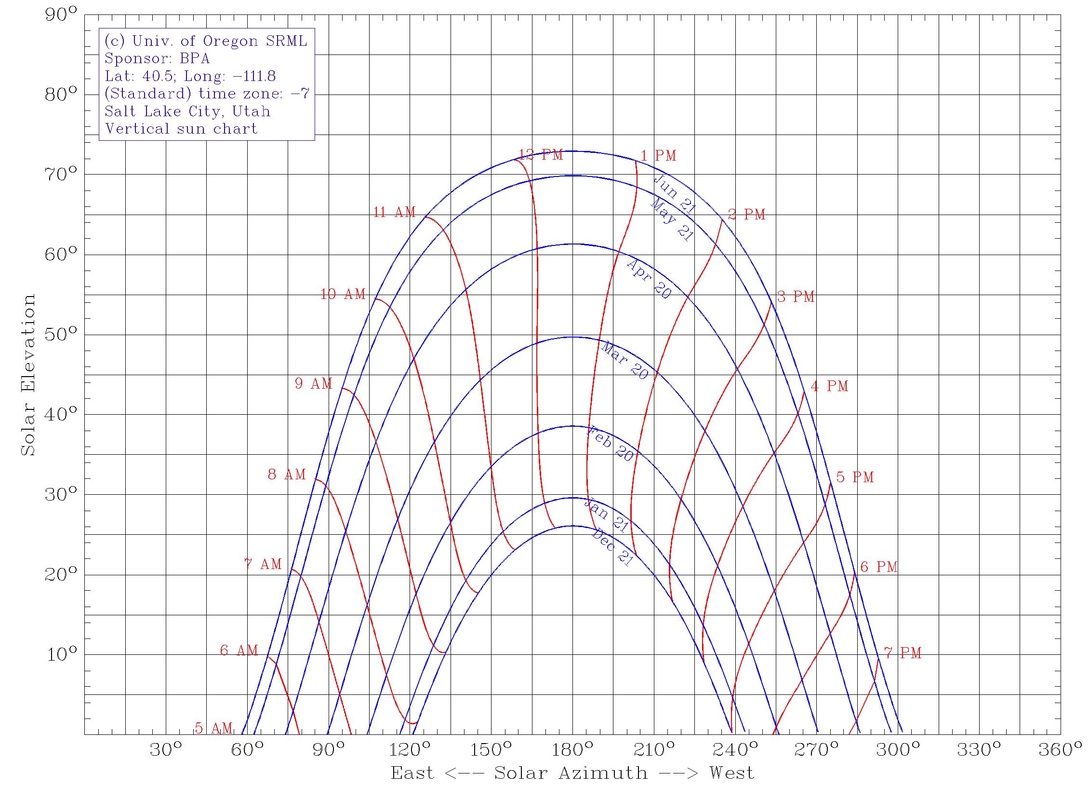
Solar Angles
Because we live in the northern hemisphere, the light that we get from the sun generally comes from the south, although the exact angles of light rays change considerably throughout the day and during different seasons. While designing our home, we had to take these changing angles into consideration.
Hot Water Heater
The purpose of this assignment was to figure out the best way to efficiently heat water using the sun. My group used a cardboard box to capture most of the heat from the sunlight and transfer it to the water. We ran copper tubing through the box on the bottom which was painted black to absorb heat. On the sides, we put aluminum foil in to reflect light and heat onto the bottom. We taped plastic wrap over the top to help trap heat. The water storage was connected to the box using plastic tubing for the water to run through. To keep the water hot, we placed an empty soda bottle in a paper bag and surrounded the bottle with insulation. Our "hot" water heater raised the temperature by nine degrees.
Solar Angles
Because we live in the northern hemisphere, the light that we get from the sun generally comes from the south, although the exact angles of light rays change considerably throughout the day and during different seasons. While designing our home, we had to take these changing angles into consideration.
Day Lighting Model
This project was an experiment to see the most effective ways to use day lighting. We made our model out of cardboard and cut various features into the walls and ceiling. After a little trial and error, we decided how we would light our house, what features we would place, and where we would place them. To see what worked well, we used a light bulb and simulated the different angles light rays would come from and recorded in percentages how much light came into which room. After looking at the results, we deduced that some things worked better than others. Here are some day lighting techniques that we learned about:
Picture windows- opening in wall for sunlight and a view
Skylights- a glazed opening in a roof to admit light.
Clerestory Windows - windows situated up high, not for view, but to catch sun rays that come in at higher angles.
Solar Tubes- opening lets in light, which bounces down reflective lining and into room.
Light Shelves- used to bounce light from the overhang on the sill, back into the room's ceiling which then reflects/diffuses light throughout the room.
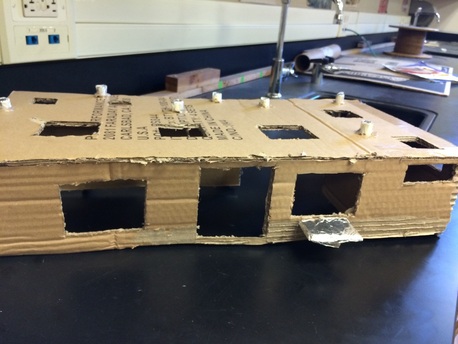
Here is our model:
This project was an experiment to see the most effective ways to use day lighting. We made our model out of cardboard and cut various features into the walls and ceiling. After a little trial and error, we decided how we would light our house, what features we would place, and where we would place them. To see what worked well, we used a light bulb and simulated the different angles light rays would come from and recorded in percentages how much light came into which room. After looking at the results, we deduced that some things worked better than others. Here are some day lighting techniques that we learned about:
Picture windows- opening in wall for sunlight and a view
Skylights- a glazed opening in a roof to admit light.
Clerestory Windows - windows situated up high, not for view, but to catch sun rays that come in at higher angles.
Solar Tubes- opening lets in light, which bounces down reflective lining and into room.
Light Shelves- used to bounce light from the overhang on the sill, back into the room's ceiling which then reflects/diffuses light throughout the room.
Here is our model:
Site Selection
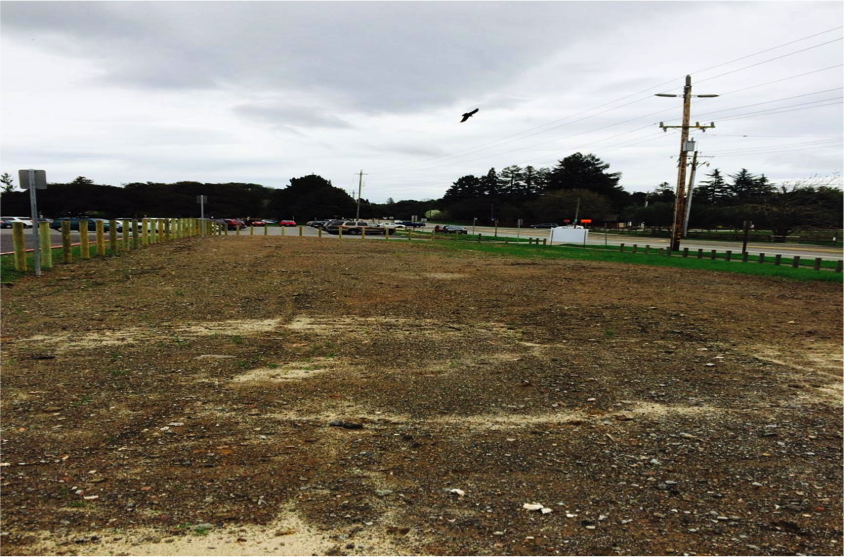
When selecting a site for our structure, we took into consideration a lot of factors. Sunlight, accessibility, solid ground, and visibility to the community are all factors when deciding where to locate our home. Based on these criteria, my group put our home on the dirt strip parallel to Novato Blvd. Because this location has solid flat ground, is well lit by the sun, is visible to the community, and is easily accessible by students, we believe this is the best place to build our house. Here is a picture of our site:
When selecting a site for our structure, we took into consideration a lot of factors. Sunlight, accessibility, solid ground, and visibility to the community are all factors when deciding where to locate our home. Based on these criteria, my group put our home on the dirt strip parallel to Novato Blvd. Because this location has solid flat ground, is well lit by the sun, is visible to the community, and is easily accessible by students, we believe this is the best place to build our house. Here is a picture of our site:
Materials Testing
Our driving questions were:
Which building materials absorb or reflect the most heat? How long do they hold heat? How quickly do those materials absorb heat?
In this experiment we were searching for the best materials for our energy efficient home. Our class came up with a well planned testing protocol. For our walls, flooring, and roofing materials we held a light bulb over them and took the temperatures every 10 minutes for 80 minutes. The light bulb was held at 30 cm above the 1 sq. foot material, and all the bulbs were 100 watts. This was to ensure that they all were getting an even amount of heat in this experiment. For our insulation we took a beaker of got water and surrounded in in the insulation. Then we checked the temperature just like we did with the materials. Lastly we recorded our results in a table, saw what the difference was, and made a graph for it as well.
Materials Tested:
Flooring- Carpet, Dark Hardwood, Light Tile, Dark Granite, Bamboo
Interior Walls- White Drywall, White Board
Exterior Walls - Brick, Stucco, Redwood
Roofing- Aluminum, PVC, Corrugated Metal
Insulation- Jeans, Styrofoam, Fiberglass Batting, Spray foam
Building Design
This was the bulk of our project. We started the building design with sketching out blueprints for our walls, ceiling, and floor. These included the windows, skylights, and door, along with the proper spacing in between the 2 x 4's and 2 x 6's. Unfortunately, we eventually had to redo them because the original plans were big enough that we needed a permit to build, and those are very pricey. Our final design was 10 by 12 feet. The materials we used were bamboo flooring, white drywall, stucco, corrugated metal, and fiberglass batting. The reason we used these materials is because they performed their various tasks the best out of all the materials we tested. We built an overhang on our roof to block out the harsh summer sun and let in the winter sun when it's cold. We had an estimated cost of $3,210 with a budget of $5,000. For our model of the home we used a digital program called Google Sketch Up. Our design includes a large picture window on the south side, three clerestory windows on the east side, a door on the west side, and two skylights in the roof. Here is our model and presentation:

Reflection
Reflecting back on this project, I think a lot of things went well and a lot of things could have gone better. My group and I definitely had the motivation necessary to get the job done. We generally worked well together and cooperated nicely as we got things finished. This showed in our final product with our blueprints and model. If someone was off task another group member would remind them to keep focused on the project. A couple things that didn't go well were timing management and organization. On a few occasions, we did not quite meet the deadline, which could have turned out better. This happened during the hot water heater project when we failed to fix our leaks in time. We could have also worked on dividing each other's separate roles because we could have been more productive.
Personally, I gained some life skills during this project as well as learning about some things I needed to work on. One skill I gained was patience. The water heater for example just did not work and I got frustrated sometimes but it is important to take a deep breath and relax. One thing I can work on is my focus during tasks. Sometimes I would get distracted and wander off during class to talk with my friends, when I really should be helping my group. I will continue to work on this and improve. Another peak for me was learning that I am a good problem solver. For example, when our hot water heater leaked I came up with the idea to fit a smaller size tubing into the copper and use a different type of glue. One more thing I can work on is taking a leadership role. For this project, I stepped back and let my classmates lead more. Next time I will try to take on a more prominent role in my group.
Concepts;
radiation- a process in which electromagnetic waves (EMR) travel through a vacuum or through matter-containing media
convection- the concerted, collective movement of groups or aggregates of molecules within (e.g., liquids,gases) and , either through or through or as a combination of both of them. Convection of mass cannot take place in solids, since neither bulk current flows nor significant diffusion can take place in solids.
insulation -is a process that keeps heat in an object.
absorption- absorption of light or other electromagnetic radiation by a material
reflection- denying heat or light from entering
temperature vs. heat- temperature- a numerical measure of hot and coldheat- energy
specific heat- the measurable physical quantity of heat energy required to change the temperature of an object by a given amount.
thermodynamics- Thermodynamics is a branch of natural science concerned with heat and temperature and their relation to energy and work.
- Zeroth law of thermodynamics: If two systems are in thermal equilibrium with a third system, they must be in thermal equilibrium with each other. This law helps define the notion of temperature.
- First law of thermodynamics: Because energy is conserved, the internal energy of a system changes as heat flows in or out of it. Equivalently, machines that violate the first law (perpetual motion machines) are impossible. Heat is the flow of thermal energy from one object to another.
- Second law of thermodynamics: The entropy of any isolated system not in thermal equilibrium almost always increases. Closed systems spontaneously evolve towards thermal equilibrium—the state of maximum entropy of the system—in a process known as "thermalization". Equivalently, machines that violate the second law (perpetual motion machines) are impossible.
- Third law of thermodynamics: The entropy of any pure substance in thermodynamic equilibrium approaches zero as the temperature approaches zero. The entropy of a system at absolute zero is typically zero, and in all cases is determined only by the number of different ground states it has.
